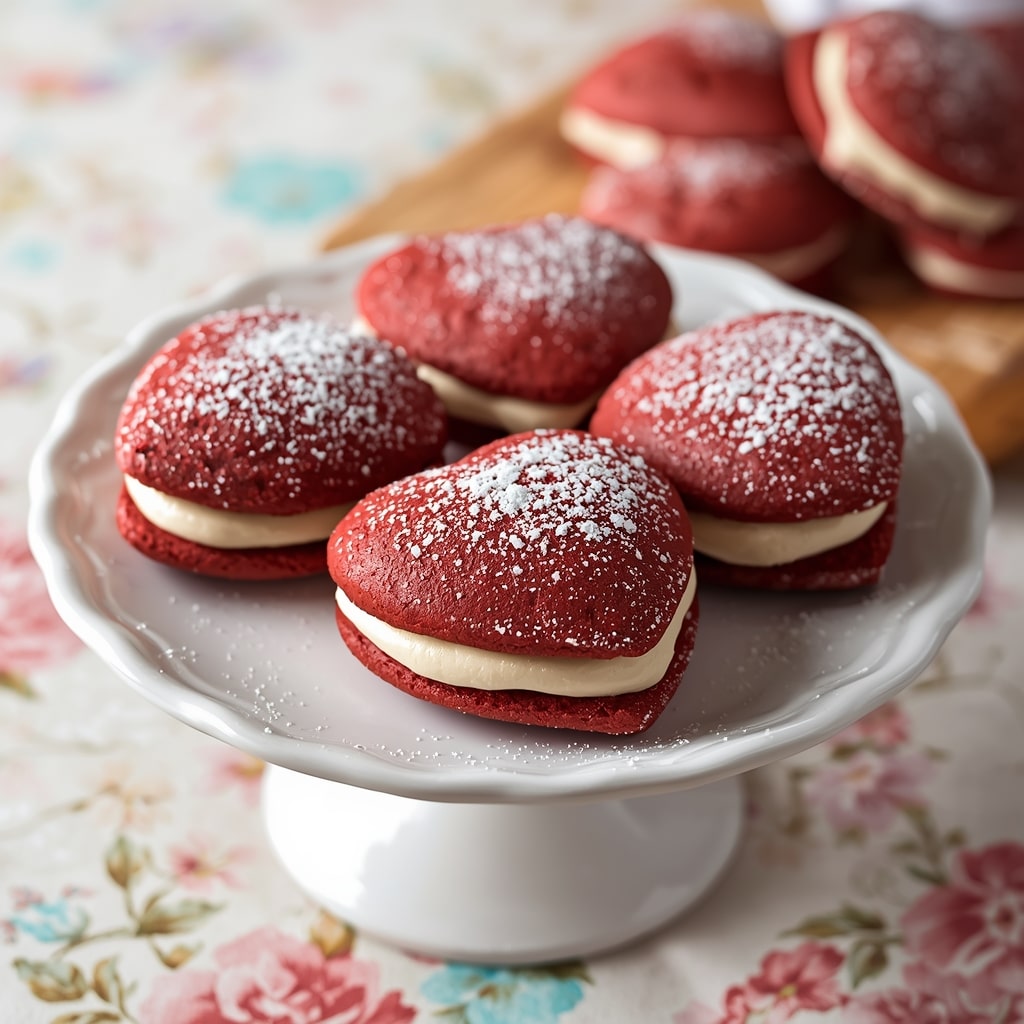
Few desserts embody love and sweetness quite like Heart-Shaped Red Velvet Whoopie Pies with Cream Filling. Soft, cake-like red velvet cookies are sandwiched around a fluffy cream cheese filling, making them the perfect handheld treat for Valentine’s Day, anniversaries, or any romantic occasion. Their rich red hue and heart shape symbolize love, while the decadent cream filling adds a luscious surprise in every bite.
I love this recipe because it’s not just a dessert—it’s a gesture of affection. The heart shape makes it special, the red velvet flavor adds indulgence, and the cream filling brings everything together in the most comforting way. These whoopie pies are playful, nostalgic, and elegant all at once.
Why I Love This Recipe
- The heart shape makes them instantly romantic and festive.
- They combine the best of cake and cookies with a soft, pillowy texture.
- The cream cheese filling is smooth, tangy, and perfectly balanced with the sweet red velvet cakes.
- They’re portable and easy to share—like edible little love notes!
Why It’s a Must-Try Dish
✔️ A unique twist on classic red velvet cake.
✔️ Perfect for gifting, dessert platters, or romantic dinners.
✔️ Fun to bake with kids or as a couple’s activity.
✔️ Customizable with sprinkles, chocolate drizzle, or different fillings.
Recipe Details
- Preparation Time: 25 minutes
- Baking Time: 10–12 minutes per batch
- Cooling & Filling Time: 20 minutes
- Total Time: ~1 hour
- Servings: About 12 whoopie pies (24 heart-shaped cakes)
- Calories (per whoopie pie): ~280 kcal
- Cuisine: American
- Course: Dessert
Ingredients
For the Red Velvet Cakes
- 2 cups all-purpose flour
- 2 tablespoons unsweetened cocoa powder
- 1 teaspoon baking powder
- ½ teaspoon baking soda
- ½ teaspoon salt
- ½ cup unsalted butter, softened
- 1 cup granulated sugar
- 1 large egg
- 1 teaspoon vanilla extract
- ½ cup buttermilk (room temperature)
- 2 teaspoons red food coloring (liquid or gel)
- ½ cup sour cream (or plain yogurt)
For the Cream Cheese Filling
- 8 oz (225 g) cream cheese, softened
- ½ cup unsalted butter, softened
- 3 cups powdered sugar, sifted
- 1 teaspoon vanilla extract
Simple Cooking Directions
- Whisk dry ingredients.
- Cream butter and sugar, then add egg and vanilla.
- Mix in buttermilk, sour cream, and red coloring.
- Combine wet and dry ingredients into a smooth batter.
- Pipe batter into heart shapes and bake.
- Prepare cream cheese filling.
- Sandwich cooled cakes with cream filling.
Step-by-Step Recipe Preparation
Step 1: Make the Batter
- Preheat oven to 350°F (175°C). Line baking sheets with parchment paper.
- In a medium bowl, whisk flour, cocoa powder, baking powder, baking soda, and salt.
- In a large bowl, cream butter and sugar until light and fluffy.
- Beat in egg and vanilla.
- Mix in buttermilk, sour cream, and red food coloring.
- Gradually add dry ingredients to wet ingredients until smooth.
Step 2: Shape & Bake Hearts
- Transfer batter to a piping bag fitted with a round tip.
- Pipe heart shapes onto the parchment (about 2 inches wide). Use a toothpick to shape tips and curves if needed.
- Bake for 10–12 minutes, until cakes spring back when touched.
- Cool completely on a wire rack.
Step 3: Make Cream Cheese Filling
- Beat cream cheese and butter until creamy.
- Add vanilla extract.
- Gradually beat in powdered sugar until smooth and fluffy.
Step 4: Assemble Whoopie Pies
- Spread or pipe cream filling onto the flat side of one heart-shaped cake.
- Top with another cake to form a sandwich.
- Repeat with remaining cakes.
How to Serve
- Serve on a platter with fresh strawberries or raspberries for extra romance.
- Dust lightly with powdered sugar or drizzle with melted chocolate.
- Pair with coffee, hot chocolate, or champagne for a sweet celebration.
Additional Recipe Tips
- Use gel food coloring for a vibrant red color.
- Chill the batter slightly before piping if it feels too soft.
- Make sure cakes are completely cooled before filling, or the cream will melt.
- Pipe the filling neatly for a professional look.
Variations
- Chocolate-Dipped Hearts – Dip half of each whoopie pie in melted chocolate.
- Berry Cream Filling – Add raspberry or strawberry puree to the filling for fruity flavor.
- Sprinkle Edges – Roll the edges of the filling in festive sprinkles.
- Mini Whoopie Pies – Pipe smaller hearts for bite-sized treats.
Freezing & Storage
- Storage: Store in an airtight container in the refrigerator for up to 4 days. Bring to room temperature before serving.
- Freezing (unfilled cakes): Freeze cooled cakes (without filling) for up to 2 months. Thaw, then fill before serving.
Special Equipment Needed
- Piping bags with round tip (for shaping hearts)
- Mixing bowls
- Electric hand or stand mixer
- Baking sheets + parchment paper
- Wire cooling rack
Conclusion
These Heart-Shaped Red Velvet Whoopie Pies with Cream Filling are the ultimate sweet treat for Valentine’s Day or any special occasion. They’re tender, velvety, and filled with luscious cream cheese frosting, making them as delightful to look at as they are to eat. Whether you gift them to a loved one or share them after a romantic dinner, these whoopie pies are sure to spread love in every bite.

Heart-Shaped Red Velvet Whoopie Pies with Cream Filling
Description
Few desserts embody love and sweetness quite like Heart-Shaped Red Velvet Whoopie Pies with Cream Filling. Soft, cake-like red velvet cookies are sandwiched around a fluffy cream cheese filling, making them the perfect handheld treat for Valentine’s Day, anniversaries, or any romantic occasion.
Ingredients
For the Red Velvet Cakes
For the Cream Cheese Filling
Instructions
-
Step 1: Make the Batter : Preheat oven to 350°F (175°C). Line baking sheets with parchment paper. In a medium bowl, whisk flour, cocoa powder, baking powder, baking soda, and salt. In a large bowl, cream butter and sugar until light and fluffy. Beat in egg and vanilla. Mix in buttermilk, sour cream, and red food coloring. Gradually add dry ingredients to wet ingredients until smooth.
-
Step 2: Shape & Bake Hearts : Transfer batter to a piping bag fitted with a round tip. Pipe heart shapes onto the parchment (about 2 inches wide). Use a toothpick to shape tips and curves if needed. Bake for 10–12 minutes, until cakes spring back when touched. Cool completely on a wire rack.
-
Step 3: Make Cream Cheese Filling : Beat cream cheese and butter until creamy. Add vanilla extract. Gradually beat in powdered sugar until smooth and fluffy.
-
Step 4: Assemble Whoopie Pies : Spread or pipe cream filling onto the flat side of one heart-shaped cake. Top with another cake to form a sandwich. Repeat with remaining cakes.